A quick and easy guide to Best Ways to Making Windows 10 bootable USB Drive Free ! Perfect for installations or repairs. Get your step-by-step instructions now!
How to Create A Windows 10 Bootable USB
Windows 10 Bootable USB Drive for Free and Easiest Here Whether you’re upgrading your operating system, troubleshooting a problematic computer, or installing Windows 10 on a new device, having a bootable USB drive on hand can save you time and frustration. . In this guide, we will walk you through the process of creating a Windows 10 bootable USB drive in a few easy steps.
Step One: You have the essentials that are required for windows 10 Bootable usb
Windows 10 Bootable USB. Before you begin, you’ll need a few things:
A USB flash drive with at least 8 GB of storage space. New or old doesn’t matter
Windows 10 ISO format file. You can download it directly from the Microsoft official website or get it from other legitimate sources.
Step Two: Format Your USB Drive
Insert your USB flash drive into a USB port on your PC. Before you continue, make sure to back up any important data on your favorite USB flash drive, as formatting will erase all present information.
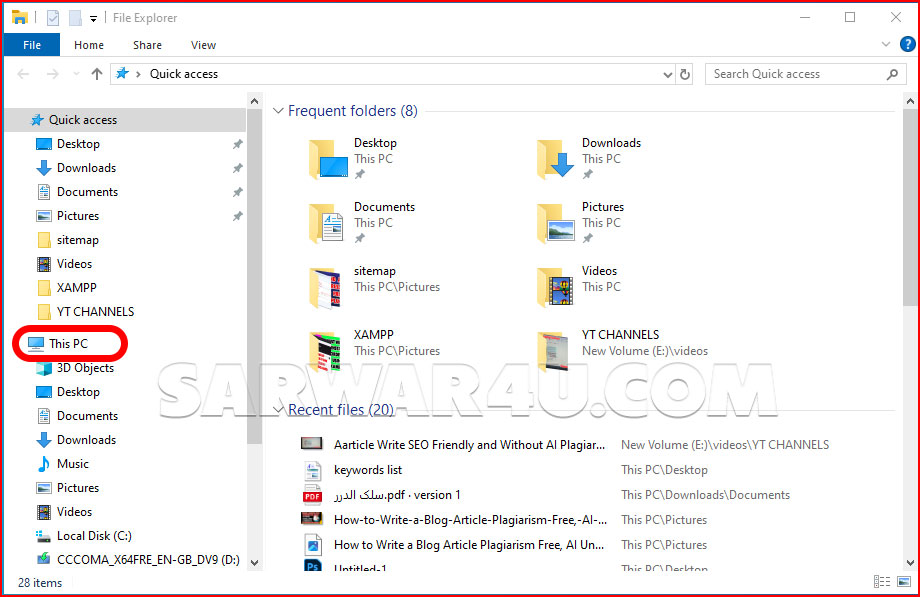
- Open File Explorer and find your USB drive.
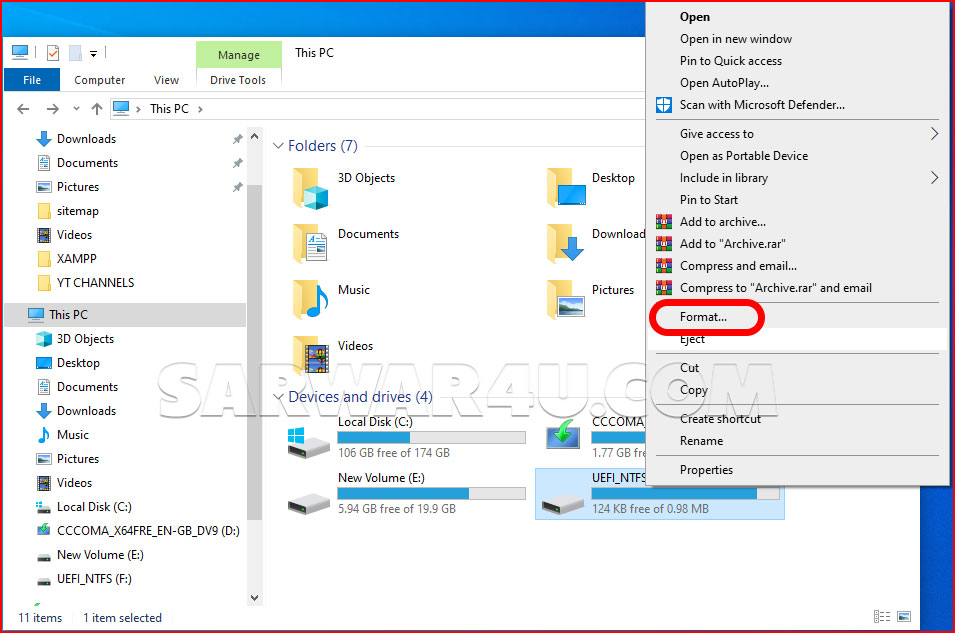
- Right-click on the USB drive and select “Format” from the context menu.
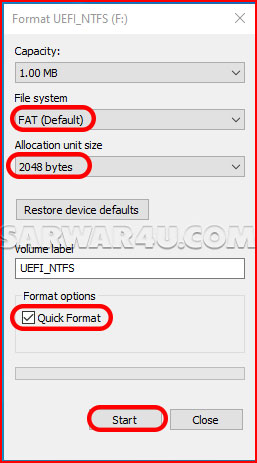
- In the Format window, ensure that the File System is ready to “FAT32” and the Allocation Unit Size is about to “Default Allocation Size.”

- Check the field subsequent to “Quick Format” and click “Start” to begin the formatting process.
- Once the layout is complete, near the Format window.
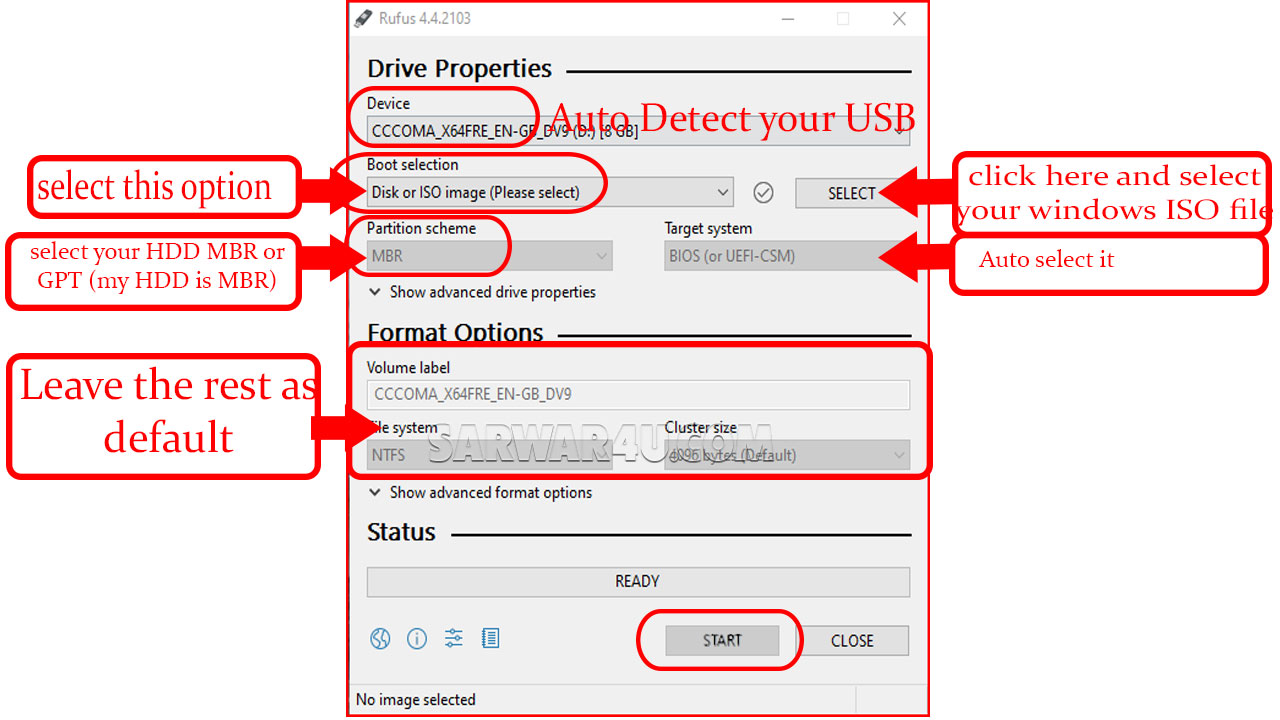
How to Create A Windows 10 Bootable USB Using Rufus
Now that your USB drive is formatted, it is time to make it bootable using the Windows 10 ISO bootable file.
- First of all, Download and set up a free software tool Rufus
- 2nd run it and follow below image instruction
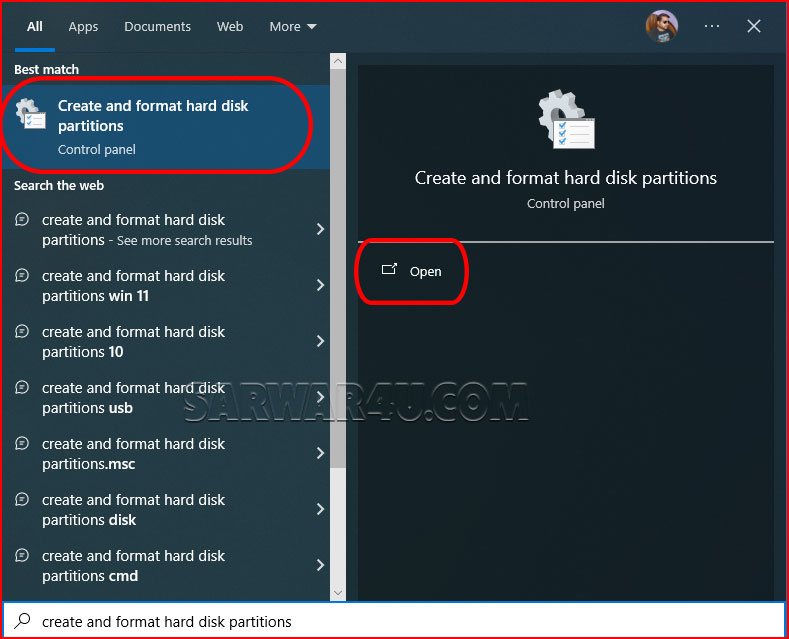
What is MBR for Creating Windows 10 Bootable USB Drive
go to windows pc search bar and serach it create and format hard disk partitions. see more for photo below
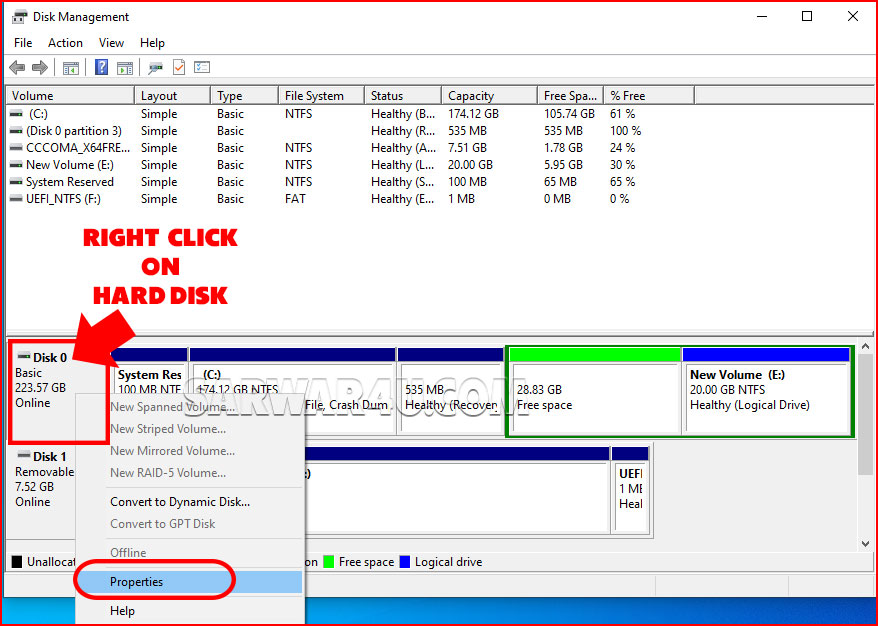
then right click on your hard disk adn click properties, see more for image below
click Volume then and you will see Master Boot Record (MBR)
You’ll see it under the Disk Information section.
In the fourth line in front of the partition style
For more details, look at the image below carefully
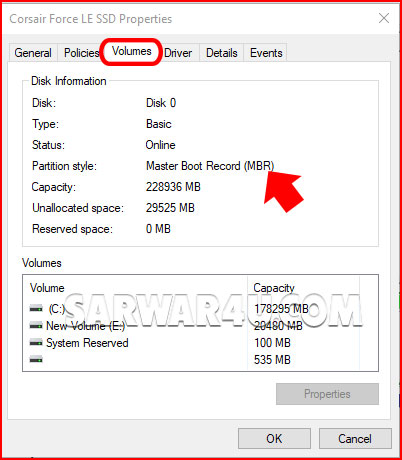
In front of partition style, if you have hard disk MBR, then it will show you MBR here and if your hard disk is GPT, then it will show you here.
How to Create A Windows 10 Bootable USB Using Windows USB/DVD Download Tool
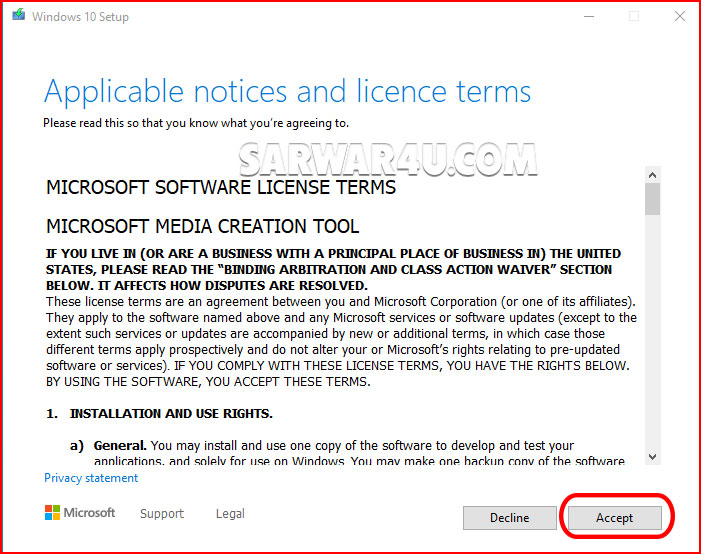
Download Here Windows USB/DVD Download Tool.
When you download it, you will open it as administrator. When it opens, the screen that will appear in front of you will show the Microsoft Terms and Conditions. In the last screen, click on accept on the right-hand side
For more, see the image below carefully.
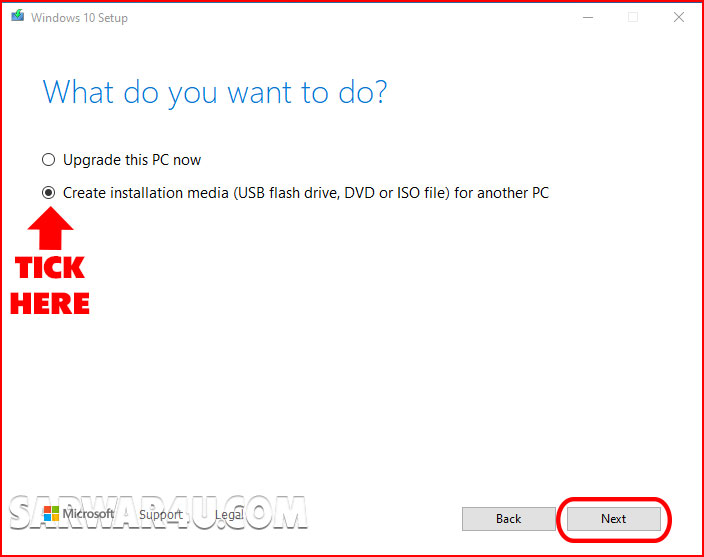
After clicking on Accept, on the screen that will be shown, click on Create installation media (USB flash drive, DVD, or ISO file for another PC), and finally click on Next at the bottom right-hand side. For more, see the image below carefully.
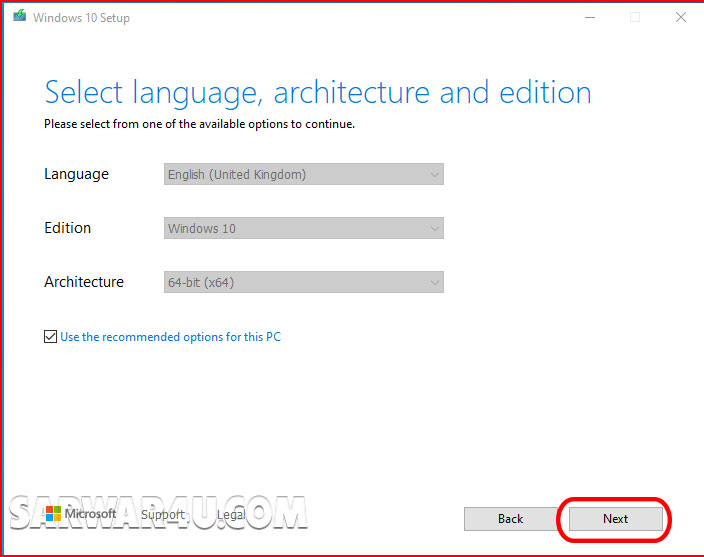
Now the screen that will appear in front of you will have language, edition, architecture ticked by default.
All items that have the Use recommended for this PC option automatically ticked will have this option selected by default.
If you want to change something, you’ll remove the Recommended use for this PC option. When you untick, you can change the language, edition, architecture, etc.
After making the changes you want to make, click Next at the bottom right.
Check the below picture carefully for more۔
Now in the front screen, it will be written on the top, choose media to use, i.e. which media do you want to use.
Below that you will have two options, USB flash drive and ISO file
We tick USB flash drive and click next
Whatever you want, see the picture below carefully for more

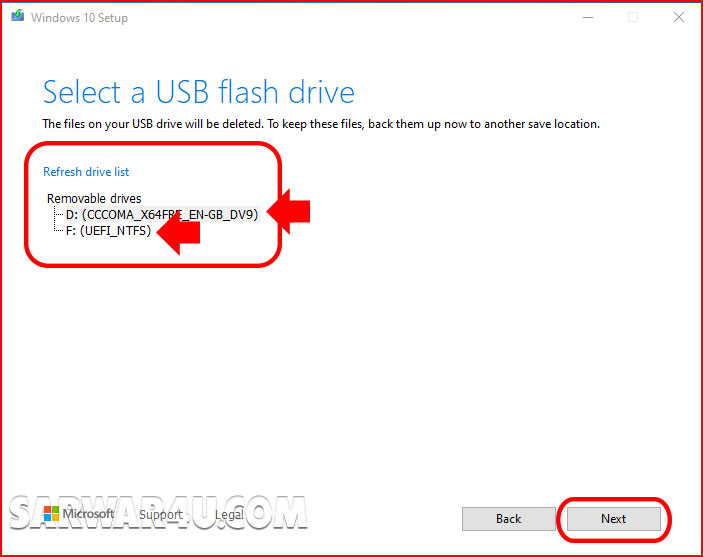
Now on the screen that appears you have to select your USB flash drive and after that you will click on next for more see the image below carefully.
Now it will download the whole window here first and then make your USB bootable but it will take some time depending on your system and internet speed. Thank you
Step four: Safely Eject Your USB Drive
Once the bootable USB force has been created effectively, it is critical to eject it correctly to avoid statistical corruption.
- Close the software device as soon as the method is whole.
- Right-click on the USB flash drive in File Explorer and pick out “Eject” from the context menu.
- Wait for the machine to confirm that it is safe to eliminate the USB power, then unplug it from your laptop.
Step 5: Test Your Bootable USB Drive
Step 5: Test Your Bootable USB Drive
Before you position your bootable USB flash drive away, it is a good concept to check it to make certain it really works successfully.
- Restart your Windows PC with the USB flash drive inserted.
- Depending on your PC’s settings, you may want to press a selected key (inclusive of F12 or ESC) to get access to the boot menu.
- Select the USB force from the boot menu and press Enter.
- If everything has been performed efficiently, your PC needs to boot from the USB force, and you’ll see the Windows 10 setup or recovery display screen.
Congratulations! You’ve successfully created a Windows 10 bootable USB power. Whether you want to install a fresh replica of Windows 10 or troubleshoot a tricky device, having this on-hand tool at your disposal can save you time and effort. Remember to preserve your bootable USB power in a secure location so that it is prepared on every occasion you need it
THE END
MORE HERE
Thanks for sharing your thoughts. I really appreciate your efforts and I will be waiting for your next post thanks once again.
you’re in point of fact a good webmaster. The website loading speed is incredible.
It seems that you are doing any unique trick.
Furthermore, The contents are masterwork. you’ve done a fantastic job in this matter!
I stumbled upon this fascinating website and I believe I may stay
here for quite some time
Naprawdę interesujący tekst, na pewno jeszcze będę zaglądał na tę stronę.
Heya i am for the first time here. I came across this board and I find It truly
useful & it helped me out much. I hope to give something back and help others like you helped me.